Bathroom Light Fittings: Can They Be Painted?
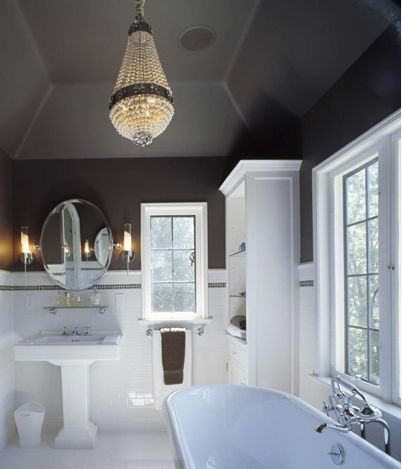
For reasons that should be relatively obvious, bathroom light fittings have a habit of looking old and worn before their time. Pretty much everything in the average bathroom is subjected to the kind of punishment that has a quick and often permanent impact on its visual quality. In most instances, homeowners instinctively choose the ‘nuclear’ option and simply replace the offending items with new fixtures.
The thing is though, there aren’t many features in the bathroom that cannot be spruced up with a new coat of paint. Heck, it’s even possible to paint your toilet – if you’re up for the challenge! As for bathroom light fittings, there’s work to be done, but the process isn’t nearly as difficult as you might expect. Particularly if you have the kinds of light fittings you prefer not to get rid of, it can also be deeply satisfying to give them a new lease of life.
So if you like the idea of sprucing up your bathroom light fittings without replacing them entirely, here’s how the process works:
Step 1 – Tool-Up
First of all, you’re going to need to ensure you’ve got all the tools and provisions you’re going to need to get the job done. In most instances, you’ll be needing a good-quality spray paint that’s suitable for the material in question. Which, in this instance, we’re to assume is metal of some kind. You’ll also need whatever tools are necessary to remove the light fittings from your ceilings and walls, drop cloths to protect the surroundings and whatever brushes and additional bits and pieces you think you’ll need.
Step 2 – Preparation
When it’s time to get down to business, the first thing to do is remove the light fitting from the respective wall or ceiling. That is, after making sure you’ve shut off the electricity supply to the entire room, of course. Remove the fixture, take out any bulbs and put all the screws and general bits and pieces somewhere safe. After which, it’s a case of deciding exactly where represents the best place to paint the fixture. If the weather’s decent enough, you might want to take things outdoors.
Step 3 – Clean And Sand
There’s a good chance the fixture may be significantly dirtier than you would have expected. In any case, it’s going to need a thorough clean from top to bottom. You’ll usually get away with a standard all-purpose cleaner, or some kind of household degreaser if things are looking particularly bad. After which, you’ll need to take a clean sheet of fine-grit sandpaper and give the whole surface a very gentle roughing-up. If the surface is already smooth and shiny, you can skip the sandpaper and use a metal primer instead.
Step 4 – Apply The Paint
While there are several options to choose from, we strongly recommend using quality spray paints for these kinds of jobs. It simply makes the whole thing much quicker and easier to tackle. Of course, when using a spray paint you’ll also need to ensure everything in the vicinity (including yourself) is sufficiently protected. Take your time, apply an extremely thin layer of paint, give it plenty of time to dry and add as many additional coats as necessary.
Step 5 – Finishing
Always give the fixture plenty of time to dry, given that the paint may look completely different once it has fully dried. It may be necessary to add multiple coats of spray paint before the desired effect is reached. Once you’re happy with the result, you can reattach the fixture, the bulbs and anything else you removed earlier. Turn the power back on, stand back and admire your handiwork!
One additional tip – use a dry cloth to give the fixture a quick wipe between each coat of paint, after allowing the respective coat to dry. This will ensure that any residual dust and dirt that may have accumulated on the surface are removed before the subsequent coat of paint is applied. In addition, try to remember that most types of spray paint are extremely flammable, so you need to be very careful when deciding on an appropriate location to get the job done!
If you have any questions regarding interior painting or anything to do with interior decorating in general, we’d be delighted to hear from you. Reach out to a member of the Homm CPS team today for more information, or to discuss your requirements in more detail.